expertSmart Home & IoT26-Feb-2020
Turning on WiFi by voice via Alexa on Raspberry Pi

Anton Shagaev
Tashkent, UZ
1 day
10
6

Hello everyone! Today we will implement the functionality of turning the radio module (like WiFi) on and off using the Alexa voice assistant on a Raspberry Pi (RPi). You can read how to install Alexa on an RPi in the guide "Voice Assistant Alexa on Raspberry Pi". All my internet at home is distributed via wires laid in hidden wiring, and my 9-year-old son uses the wireless connection as needed; the rest of the time the radio module is turned off.
My router is from Asus, model RT-N15U, and this example will be considered specifically for this router model. By analogy, you can do this for your own router, although there is no 100% guarantee it will work. I also have an optical terminal (fiber optic internet) at home, which has its own radio module, and using this scheme, I couldn't turn the wireless internet on and off there. I connected the Asus router to the general local subnet and implemented this scheme on it.
As you know, you can turn the wireless connection on and off through the router's web interface by accessing its page on the local network, for example, 192.168.0.1. It was impossible to connect to the router programmatically via the SSH protocol because Asus did not implement such functionality in the RT-N15U. I first flashed the router with custom firmware from the OpenWrt project, as it allowed logging into the router via the SSH protocol and then turning the radio module on/off via a terminal command. But in the end, it turned out that for the RT-N15U, the firmware drivers did not support the radio module function at all. I had to revert to the stock Asus firmware and use the following scheme. We will capture packet dumps on the local network from the RPi to the router using tcpdump, and then reproduce the transmission of POST requests using the curl_exec function in PHP.
What you'll need
Materials
- Router with radio module1 pc
- Raspbian OS with graphical interface (GUI)1 pc
- RPi with installed Alexa1 pc
- Apache server with PHP on RPi1 pc
- Tcpdump program on RPi1 pc
- Wireshark program on RPi1 pc
Steps
1
Packet dump capture between RPi and router
Packet dump capture between RPi and router
Packet dump capture between RPi and router
First, installtcpdumpon RPi. Open the terminal and enter the command:
tinkster@almalinux:~#
1sudo apt install tcpdump
Install Wireshark:
tinkster@almalinux:~#
1sudo apt install wireshark
Go to the home folder:
tinkster@almalinux:~#
1cd ~
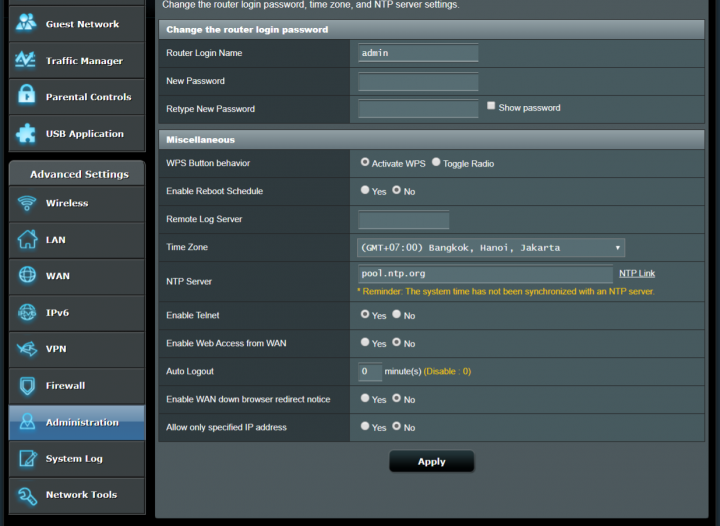
Open the browser on RPi and enter the local IP address of our router there, for example 192.168.0.1. Enter the login/password and log into the router. Go to Administration and set Auto Logout to 0 (disable). This is necessary so that the current session in the admin panel is saved indefinitely. If in your router settings you cannot disable Auto Logout, then the session variable will be reset after a certain period. I observed this on my optical terminal; the timeout cannot be disabled and is set from 1 to 30 minutes. In the Asus router, it can be disabled, but most likely (I haven't checked yet) the session variable will be deleted when the router is rebooted.
Log out of the router and go to 192.168.0.1, enter the login and password again, but do not press the Sign in button yet.
Open the terminal and enter the command:
tinkster@almalinux:~#
1ifconfig
We need to find out the name of the network adapter on RPi. In my case, it is eth0.
Next, enter the command:
tinkster@almalinux:~#
1tcpdump -w eth0_dump.pcap -i eth0 host 192.168.0.1
This command will scan TCP traffic both from RPi to the router and from the router to RPi and save the results in the file eth0_dump.pcap
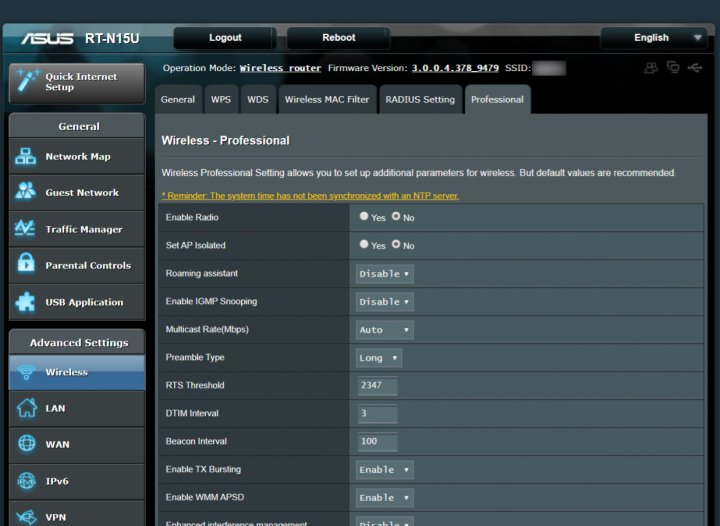
Then return to the browser with the open router login page and press the Sign in button. Next, go to the section Wireless, tab Professional, set the radio button Enable Radio to Yes and press Apply, then set it back to No and press Apply.
Next, return to the terminal and stop tcpdump by pressing CTRL+C.
That's it, the packet dump is finished. Return to the browser window and close it, without logging out of the router admin panel.
2
Packet analysis in Wireshark
Launch Wireshark and open our saved file in it eth0_dump.pcap.
We are interested in the following line in the column Info:
POST /start_apply.htm HTTP/1.1 (application/x-www-form-urlencoded)
Right-click on it, select Copy -> …as Printable Text. Next, open a text editor, paste the copied content and save.
The copying result should be similar to the analogous one in this example:
tinkster@almalinux:~#
1POST /start_apply.htm HTTP/1.12Host: 192.168.0.13Connection: keep-alive4Content-Length: 6325Cache-Control: max-age=06Origin: http://192.168.0.17Upgrade-Insecure-Requests: 18DNT: 19Content-Type: application/x-www-form-urlencoded10User-Agent: # Data hidden11Accept: text/html,application/xhtml+xml,application/xml;q=0.9,image/webp,image/apng,*/*;q=0.8,application/signed-exchange;v=b3;q=0.912Referer: http://192.168.0.1/Advanced_WAdvanced_Content.asp13Accept-Encoding: gzip, deflate14Accept-Language: en-US,en;q=0.915Cookie: asus_token=2905583498947782384812342334534; wireless_list=; traffic_warning_0=2020.1:1; nwmapRefreshTime=1582606239936; clock_type=11617productid=RT-N15U&wl_nmode_x=1&wl_gmode_protection_x=¤t_page=Advanced_Wadvanced_Content.asp&next_page=Advanced_Wadvanced_Content.asp&group_id=&modified=0&first_time=&action_mode=apply_new&action_script=restart_wireless&action_wait=3&preferred_lang=EN&firmver=3.0.0.4&wl_subunit=-1&wl_amsdu=auto&wl_TxPower=&wl1_80211h_orig=&acs_dfs=&w_Setting=1&wl_unit=0&wl_radio=1&wl_timesched=0&wl_ap_isolate=0&wl_rate=0&wl_user_rssi=0&wl_igs=0&wl_mrate_x=0&wl_rateset=default&wl_plcphdr=long&wl_rts=2347&wl_dtim=3&wl_bcn=100&wl_frameburst=on&wl_PktAggregate=0&wl_wme_apsd=on&wl_DLSCapable=0&wl_noisemitigation=0&wl1_80211h=0&wl_txpower=100
P.S. In this example, the data User-Agent is hidden, and the variable asus_token is changed.
Parameter asus_token=2905583498947782384812342334534, this is the session identifier on the router side. The session will remain constant as long as the admin logout timer is disabled. It will change if you log out of the router admin panel and log back in. The packet scanning procedure will need to be performed again.
We look for the next POST packet (for disabling the radio module), analyze its data and understand that its headers are identical, and it differs only in the body by one variable value. In the POST packet for enabling it is wl_radio=1, and for disabling it is wl_radio=0.
That's it, data collection is complete.
3
PHP script to execute the curl_exec function
Next, write the following PHP script and insert your session data into it:
tinkster@almalinux:~#
1<?2if (isset($_POST['code'])) $code = $_POST['code']; else $code = "";34$code_wifi_on = "4BvZGFz6";5$code_wifi_off = "ctHUAopI";67if ($code == $code_wifi_on || $code == $code_wifi_off) {89$headers = array(10'Connection: keep-alive',11'Content-Length: 632',12'Cache-Control: max-age=0',13'Origin: http://192.168.0.1',14'Upgrade-Insecure-Requests: 1',15'DNT: 1',16'Content-Type: application/x-www-form-urlencoded',17'User-Agent: ', # Data is hidden18'Accept: text/html,application/xhtml+xml,application/xml;q=0.9,image/webp,image/apng,*/*;q=0.8,application/signed-exchange;v=b3;q=0.9',19'Referer: http://192.168.0.1/Advanced_WAdvanced_Content.asp',20'Accept-Encoding: gzip, deflate',21'Accept-Language: en-US,en;q=0.9',22'Cookie: asus_token=2905583498947782384812342334534; wireless_list=; traffic_warning_0=2020.1:1; nwmapRefreshTime=1582606239936; clock_type=1'23);2425if ($code == $code_wifi_on) $radio =1; else $radio = 0;2627$ch = curl_init();28curl_setopt($ch, CURLOPT_URL,"http://192.168.0.1/start_apply.htm");29curl_setopt($ch, CURLOPT_POST, 1);30curl_setopt($ch, CURLOPT_HTTPHEADER, $headers);31curl_setopt($ch, CURLOPT_POSTFIELDS,32"productid=RT-N15U&wl_nmode_x=1&wl_gmode_protection_x=¤t_page=Advanced_WAdvanced_Content.asp&next_page=Advanced_WAdvanced_Content.asp&group_id=&modified=0&first_time=&action_mode=apply_new&action_script=restart_wireless&action_wait=3&preferred_lang=EN&firmver=3.0.0.4&wl_subunit=-1&wl_amsdu=auto&wl_TxPower=&wl1_80211h_orig=&acs_dfs=&w_Setting=1&wl_unit=0&wl_radio=".$radio."&wl_timesched=0&wl_ap_isolate=0&wl_rate=0&wl_user_rssi=0&wl_igs=0&wl_mrate_x=0&wl_rateset=default&wl_plcphdr=long&wl_rts=2347&wl_dtim=3&wl_bcn=100&wl_frameburst=on&wl_PktAggregate=0&wl_wme_apsd=on&wl_DLSCapable=0&wl_noisemitigation=0&wl1_80211h=0&wl_txpower=100");3334$server_output = curl_exec($ch);35curl_close ($ch);3637if ($server_output == "true" && $code == $code_wifi_on) {38exec("/usr/bin/ledon");39}4041if ($server_output == "true" && $code == $code_wifi_off) {42exec("/usr/bin/ledoff");43}44}45?>
In this script, I also specified the path to 2 files for controlling the brightness of the built-in LED on the RPi, to visually know when the radio module is on and when it is off.
Let's create these files:
tinkster@almalinux:~#
1sudo nano /usr/bin/ledon
Insert the following into it:
tinkster@almalinux:~#
1#!/bin/bash2sudo sh -c 'echo 255 > /sys/class/leds/led1/brightness'
Save it and make it executable:
tinkster@almalinux:~#
1sudo chmod +x /usr/bin/ledon
Then create a file ledoff:
tinkster@almalinux:~#
1sudo nano /usr/bin/ledoff
Insert the following into it:
tinkster@almalinux:~#
1#!/bin/bash2sudo sh -c 'echo 0 > /sys/class/leds/led1/brightness'
Save it and make it executable:
tinkster@almalinux:~#
1sudo chmod +x /usr/bin/ledoff
4
Integration with Alexa
Next, we link this PHP script with Alexa through the serviceIFTTT. You can read about how to do this in the article "I am a universal IR remote with Alexa voice control"
Now, to turn on WiFi, just say – 'Alexa, trigger wifi on…”
Profit! :)
Conclusion
Friends, today, as I expected, the session was destroyed when the router was rebooted and this scheme becomes half-functional. I tried once again to find custom firmware with SSH for the RT-N15U and this time I managed to do it! I downloaded and flashed the router with firmware from Tomato and credit where credit's due, this is a very cool firmware with a ton of settings. The most important thing is that it has access to the router via the SSH protocol, which means you can freely turn the radio module on and off via the terminal and bind voice control via Alexa.
I downloaded the firmware tomato-K26-1.28.RT-N5x-MIPSR2-140-Max.zip, because the firmware weighs ~7 megabytes, and the size of my router's Flash memory is only 8 megabytes.
Since the firmware recovery program from Asus is for Windows, we will flash our router in this operating system. Connect the computer to the router via any LAN port.
Open the program Asus Firmware Restoration, specify the path to the firmware, but do not press the Upload button yet!
Unplug the router from the outlet, hold down the Reset button and, without releasing it, plug the router into the outlet and hold it like that for about 10 seconds, until the blue LED on the router starts blinking slowly. As soon as we observe this, immediately return to the program window and press Upload. This needs to be done quickly, because you will have a limited 'window' of being in this mode. After pressing the Upload button, the flashing process will begin; during this time, do not touch the router and computer, do not move the LAN cable, otherwise you can 'brick' the device!
After flashing the router, we need to clear the non-volatile memory NVRAM of the previous settings from the old firmware. To do this, unplug the router from the outlet, hold down the WPS button on the router and, without releasing it, plug the router into the outlet and wait about 10 seconds. After that, release WPS and wait about 2-3 minutes.
After this procedure, turn the router off and on again, and then try to log into the admin panel at 192.168.1.1 with the username admin and password admin. After logging into the admin panel, I suggest immediately changing the password. I suggest immediately changing the router's LAN IP to 192.168.0.1 and accessing the admin panel via the now familiar IP address. Turn off the router again, also connect the LAN cable going to your apartment to the WAN port and turn the router on again.
Go to the section Basic and configure the radio module data.
Next, log in via SSH to the RPi and create SSH keys:
tinkster@almalinux:~#
12ssh-keygen
We are interested in the public key, which will be generated in the file id_rsa.pub. Open this file:
tinkster@almalinux:~#
1nano ~/.ssh/id_rsa.pub
Copy its contents, return to the router's admin panel, go to the section Administration / Admin Access and paste the contents of the file into the field Authorized Keys. Also, on the page Admin Access in the section SSH Daemon check the box Remote Access and uncheck the checkbox from Limit Connection Attempts.
After that, click the Save button, and now you can log into the router via SSH from the RPi without a password prompt:
tinkster@almalinux:~#
1
Now the opposite. To log in via SSH from the router to the RPi also without a password, you need to do the following. First, activate the JFFS partition on the router. This is a piece of free flash memory on the microcontroller left after flashing the firmware (~7 megabytes), and this partition can be mounted as a mini-disk on the router, which will store data even after a reboot. Go to Administration / JFFS, activate it and perform a cleanup (Erase). After that, you can access it in the router's terminal:
tinkster@almalinux:~#
1cd /jffs
SSH secret keys are stored on the router in the folder /etc/dropbear. The router has a stripped-down version of OpenSSH called Dropbear. The public keys for both programs have the same structure.
Generate the router's public key and save it to our mini-disk:
tinkster@almalinux:~#
1dropbearkey -y -t rsa -f /etc/dropbear/dropbear_rsa_host_key > /jffs/id_rsa.pub
Copy the public key to the RPi:
tinkster@almalinux:~#
1scp /jffs/id_rsa.pub [email protected]:/home/pi
Then log into the RPi via SSH in /home/pi:
tinkster@almalinux:~#
12cd ~
and add the router's public key data to the file authorized_keys:
tinkster@almalinux:~#
1cat id_rsa.pub >> .ssh/authorized_keys
Next, open the file authorized_keys:
tinkster@almalinux:~#
1nano .ssh/authorized_keys
And remove lines from it by pressing CTRL+K:
tinkster@almalinux:~#
1Public key portion is:2Fingerprint:
Save the file.
That's it, now you can log into the RPi from the router without entering a password. This will be needed to turn off the red LED on the RPi.
Another point: when logging into the RPi from the router, SSH will tell you that the RPi's IP address is not in the list of trusted hosts and ask you to continue:
tinkster@almalinux:~#
1Do you want to continue connecting? (y/n)
This seems to be a dropbear bug, and the message will appear again after rebooting the router, meaning it will affect the execution of terminal commands. To bypass this, we will connect to the RPi via SSH with the -y parameter and mandatory specification of the secret key on the router, for example:
tinkster@almalinux:~#
1ssh -y -i /etc/dropbear/dropbear_rsa_host_key [email protected]
So, all the necessary settings are done, and now on the Apache server on the RPi we write the following script:
tinkster@almalinux:~#
1<?2if (isset($_POST['code'])) $code = $_POST['code']; else $code = "";34$code_wifi_on = "4BvZGFz6";5$code_wifi_off = "ctHUAopI";67$cmd_wifi_on = "/usr/bin/ssh [email protected] wl radio on";8$cmd_wifi_off = "/usr/bin/ssh [email protected] wl radio off";910if ($code == $code_wifi_on) {11shell_exec($cmd_wifi_on);12exec("/usr/bin/ledon");13}14if ($code == $code_wifi_off) {15shell_exec($cmd_wifi_off);16exec("/usr/bin/ledoff");17}18?>
Feel the difference in size between this and the previous script in the main instructions? :)
Next, return to the router admin panel and go to Administration / Scheduler and in the section Custom 1 insert the following script:
tinkster@almalinux:~#
1#!/bin/sh2RADIO=`wl isup`34if [ $RADIO == 1 ]5then6/usr/bin/ssh -y -i /etc/dropbear/dropbear_rsa_host_key [email protected] ledon7else8/usr/bin/ssh -y -i /etc/dropbear/dropbear_rsa_host_key [email protected] ledoff9fi
Then check the box Enabled and set the script to run every minute. This is needed so that the router can turn the LED on/off on the RPi even after the RPi reboots. If you don't need the LED indicator on the RPi, you don't have to do this. I needed it because my router is hidden in a hard-to-reach place and my son constantly forgets to turn off the WiFi. :)
Next, go to Administration / Script and in Shutdown set:
tinkster@almalinux:~#
1/usr/bin/ssh -y -i /etc/dropbear/dropbear_rsa_host_key [email protected] ledoff
Press Save.
Perhaps this doesn't need to be set, since there is already a scheduler performing the same actions every minute, but in this case, there won't be an immediate effect of turning off the LED after starting a reboot or shutting down the router.
Also, on the RPi, we will turn off all LEDs after the system boots:
tinkster@almalinux:~#
1sudo nano /etc/rc.local
And until exit 0 insert lines:
tinkster@almalinux:~#
1sh -c 'echo 0 > /sys/class/leds/led0/brightness'2sh -c 'echo 0 > /sys/class/leds/led1/brightness'
Perhaps, this will conclude the system setup! Let me remind you once again that this is the most reliable scheme for turning the radio module on and off via the SSH protocol, and it is not afraid of equipment reboots. The on/off scheme provided at the beginning of the instructions will suit all those who cannot access their router via SSH, but in this case, you need to monitor its uninterrupted operation; otherwise, the session identifier will need to be obtained again.
Discussion (0)
No comments yet. Be the first!
Maker
Anton Shagaev
Tashkent, UZ
Anton is the Founding Engineer at Tinkster. He translates industrial reliability into software architecture, ensuring the platform's core is built to last. Anton studied oil and gas engineering in the United States and also holds two honors degrees from Tomsk Polytechnic University.
Related Projects


AI Project Assistant
Tinkster Neural Core
Hi! I am the AI assistant for this project. Ask me any questions about the assembly, code, or components.