Universal Robotic Grab Handle

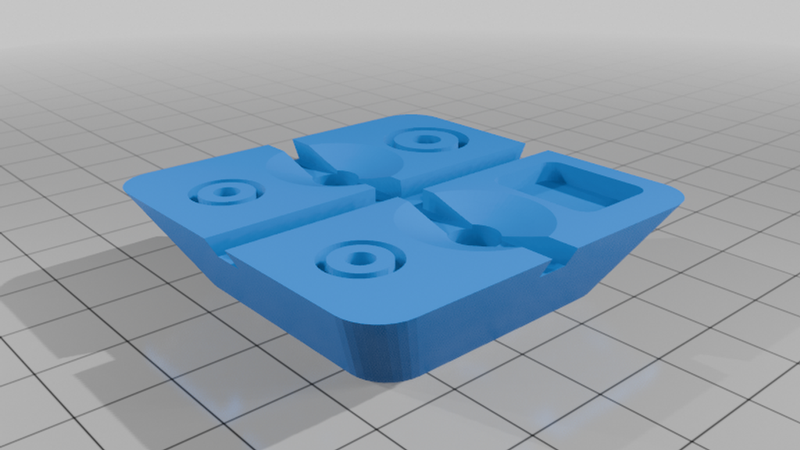
Description
Universal Robotic Grab Handle (URGH) — 50mm machine Vision Target Plate
Handles are made for humans, this one is made for robots.
It can also form the basis for a robot arm tool changer universal tool mount.
It's designed with optical machine vision target reticles, and X,Y axis reticle, and up to 4 though hole mounts.
I chose a 25x25 mm design for hand sized robots.
Once machined or printed, the target reticles can be filled with puff paint, paint or markers for whatever color contrast preference you may have.
Open SCAD file for your customization preference.
Releasing this to the community for Open Source adoption.
This customizable, high-precision interface plate is engineered for robotic end-effectors, fixture alignments, and optical tracking workcells. Designed entirely in OpenSCAD, the block combines structural interlocking mechanics with high-contrast computer vision tracking payloads.
🤖 What It Does & Why
The URGH acts as a repeatable and predictable grab handle for objects, tools, welding heads, cameras, etc...
By attaching an URGH to any object, make it robot compatible! Tools, objects, bins, pulls, etc.. all targetable using computer vision, completely customizable to any dimension and thickness you prefer.
Modular - You can "make your own" standard, according to the size, load, gripper angle and contact points you need.
This design makes it where you can scale it to work with any size that is compatible with your fastener system.
* 4-Way 60° Interlocking Overhang: The entire perimeter features a precise 60-degree inverse chamfer (undercut). This creates a mechanical interlock that gripper robot arms can fasten on with their gripper claws.
Now you can retrofit common items with "Robotic Grips", where the robot arm has a robust, consistent, and optically targetable handle with a consistent gripping structure.
Optically Optimized Payload: The top face hosts a complete suite of computer vision features—including full X/Y coordinate crosshair reticles, an asymmetric 3-point fiducial array (Q1, Q2, and Q3 concentric markers), and a filleted QR-code data pocket. This asymmetry allows overhead tracking cameras to instantly calculate the exact X, Y, and yaw ($\theta$) orientation of the plate in real-time.
🛠️ Printing & Fabrication Guidelines
To ensure the interlocking angles slide cleanly and the mounting fasteners fit perfectly, apply these slicing parameters:
* Layer Height: 0.15mm to 0.20mm. Finer layers prevent steps along the sloped 60-degree undercut edges, ensuring smooth mechanical sliding.
* Infill: 30% to 50% Grid or Gyroid infill. The areas around the axis-aligned M5 through-holes require adequate structural integrity to handle fastening torque.
* Wall Line Count: Minimum of 4 perimeters. This ensures that the deep engraving channels (vision_depth) carve into solid plastic rather than breaking into hollow infill cavities.
Supports: None required; Print face or face down, your choice.
🎨 Post-Processing & Paint Infill Tips (For Optical Tracking)
To achieve reliable detection from OpenCV, AprilTag, or machine vision camera pipelines, the engraved marks require absolute contrast against the rest of the plate body. Use the Paint Infill Method to get pristine, crisp lines:
1. Color Contrast Printing: Print the main body in a matte, light-absorbing color (e.g., Matte Black or Dark Gray PLA/PETG). Avoid glossy filaments, which create glare that blinds camera lenses.
2. Flooding the Recesses: Take a high-opacity acrylic paint (such as Bright White or Fluorescent Neon Yellow) and use a fine brush or syringe to generously flood the crosshair reticles, concentric rings, and QR code pockets. Don't worry about getting paint outside the lines. I like to use mounting putty to dam up the drill holes and chamfers if you're using them.
3. The Squeegee Method: While the paint is wet, take an gift card or plastic scraper, hold it flat at a tight angle against the plate surface, and scrape firmly across the face. This cleanly wipes away the excess paint from the flat top surface while leaving the recessed channels filled flush.
4. Final Clean: Once the paint dries completely, use a lint-free cloth dampened with a tiny drop of isopropyl alcohol (IPA) to polish off any remaining hazy residue from the top face.
Puff Paint works great for this process! I like to use glow in the dark puff paint. Clear 2 part epoxy will also work.
Users can customize the OpenSCAD variables and experiment with different URGHs; Share your prints!