MacBook / MacBook Pro Unibody Rubber Feet A1278 A1286 A1297 - Bottom Case Replacement

Description
MacBook Pro Unibody Replacement Feet – A1278 / A1286 / A1297
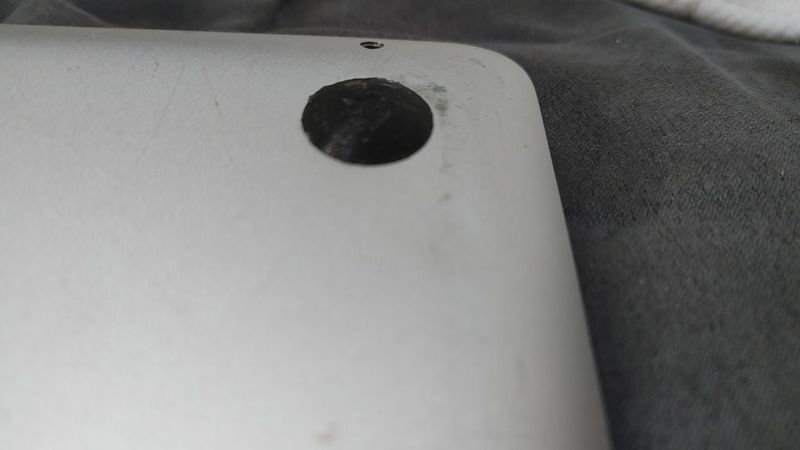
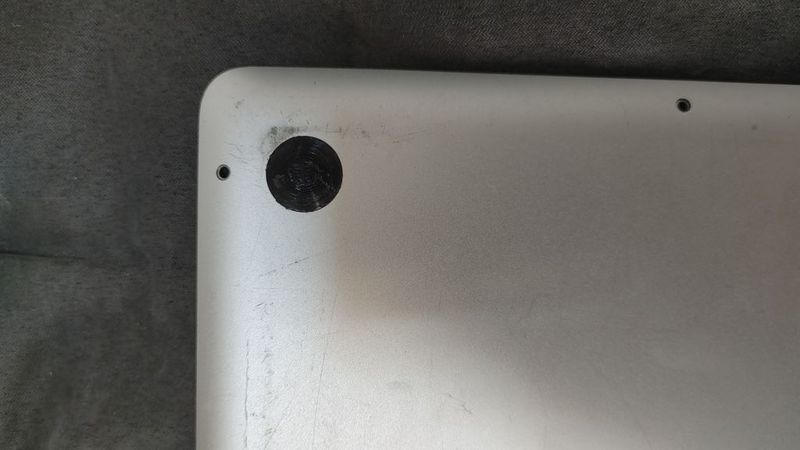
This is a 3D-printable replacement for the rubber-style bottom feet used on the classic aluminum MacBook and MacBook Pro Unibody models.
I designed the part using a 2011 13-inch MacBook Pro A1278 as the reference and tried to reproduce the size, shape and mounting geometry of the original foot as closely as possible.
The same style of bottom foot was used across several of Apple's non-Retina Unibody MacBooks, so the model should also be compatible with other machines using the same mounting system, including:
MacBook 13-inch Aluminum Unibody A1278 – Late 2008
MacBook Pro 13-inch A1278 – Mid 2009 to Mid 2012
MacBook Pro 15-inch A1286 – Unibody models
MacBook Pro 17-inch A1297 – Unibody models
The 2011 A1278 is the model I designed and tested the part for. Compatibility with the other models is based on their shared Unibody foot design, so I recommend printing and testing one foot before printing a complete set if you are using another model.
DESIGNED FOR MECHANICAL RETENTION
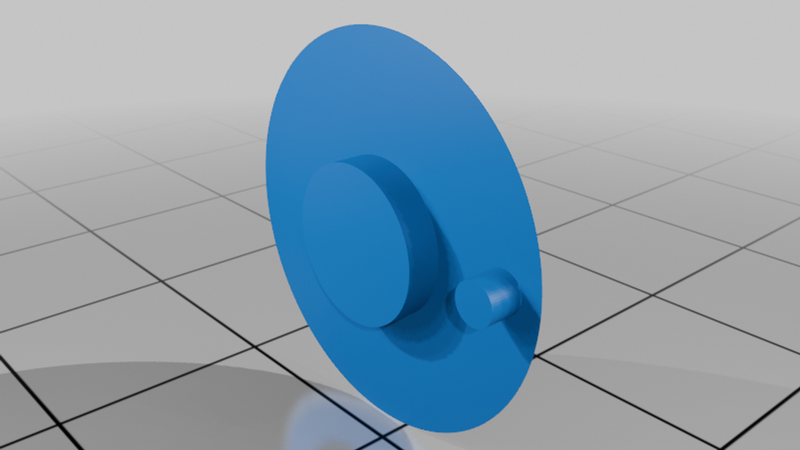
The replacement has a smaller cylindrical post underneath the main foot.
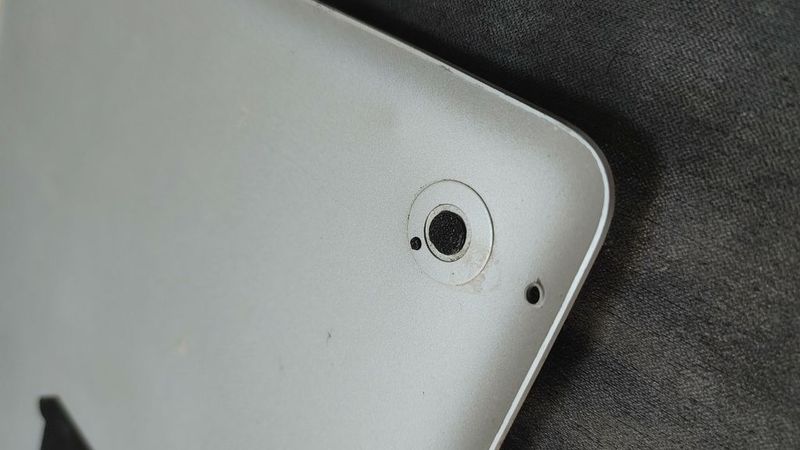
This post passes through the original mounting hole in the MacBook's aluminum bottom cover.
I specifically designed the post so that, once the foot is positioned correctly, the end of the smaller cylinder can be carefully melted and flattened from the inside of the removed bottom cover.
This creates a wider mushroom-shaped end, similar to a small plastic rivet, which prevents the foot from pulling back through the mounting hole.
This means the foot can be mechanically retained instead of relying entirely on glue.
A small amount of suitable adhesive can still be added if desired, but it should not be necessary when the post has been formed correctly.
TPU RECOMMENDED
TPU is the recommended filament for the finished feet, ideally around 95A Shore hardness.
TPU is much closer to the behavior of the original rubber-style feet than a rigid filament. It provides:
Better grip on desks and smooth surfaces
A more rubber-like feel
Slight cushioning
Less chance of scratching the surface underneath the laptop
Better flexibility and impact resistance
Less sliding than a rigid PETG foot
A dedicated Generic TPU 0.08 mm High Quality profile is included in the supplied 3MF.
The model can also be printed in PETG.
I originally printed the feet in black PETG because that was the black filament I had available at the time. PETG therefore remains a tested alternative and has its own optimized profile included in the same 3MF.
PETG produces a noticeably harder and more slippery foot than TPU, but it is durable and works particularly well with the heat-staked retention post.
TPU AND THE RETENTION POST
The smaller post can also be heat-formed when the model is printed in TPU.
Because TPU remains flexible after cooling, the finished retaining head will not become as rigid as one made from PETG. When using TPU, form a reasonably wide mushroom-shaped end so that it cannot pull back through the bottom-case opening.
A small amount of suitable adhesive may optionally be added if additional retention is wanted.
Do not attempt to heat-stake the foot while the bottom cover is installed on the computer.
Remove the aluminum bottom cover first, install the foot into the cover, form the retaining post, allow it to cool, and only then reinstall the cover on the MacBook.
INSTALLATION
Remove the MacBook's aluminum bottom cover.
Remove any remaining pieces of the original damaged foot.
Clean the original mounting hole.
Insert the smaller cylindrical post through the hole from the outside of the cover.
Make sure the large circular foot is sitting completely flat against the outside surface.
Hold the foot firmly in position.
From the inside of the removed cover, carefully heat only the end of the smaller cylindrical post.
Gently flatten and widen the softened end.
Create a small mushroom-shaped retaining head wider than the mounting hole.
Allow the material to cool completely.
Check that the foot cannot pull back through the hole.
Reinstall the bottom cover on the MacBook.
Only the end of the post needs to be softened.
Do not melt the complete post, as enough material needs to remain between the foot and retaining head to hold the part securely against the bottom cover.
A small soldering iron tip or another controllable heated tool can be used to form the retaining head.
COMPATIBILITY
Designed and tested for
MacBook Pro 13-inch A1278 – 2011
Expected compatibility
MacBook 13-inch Aluminum Unibody A1278 – Late 2008
MacBook Pro 13-inch A1278 – Mid 2009
MacBook Pro 13-inch A1278 – Mid 2010
MacBook Pro 13-inch A1278 – Early 2011
MacBook Pro 13-inch A1278 – Late 2011
MacBook Pro 13-inch A1278 – Mid 2012
MacBook Pro 15-inch A1286 – Unibody
MacBook Pro 17-inch A1297 – Unibody
The model is not intended for Retina MacBook Pro or MacBook Air models, which use different bottom-foot designs.
If using the model on anything other than the 2011 A1278, I recommend printing one foot first and checking the fit before producing all four.
INCLUDED FILES
macbook_support.stl
Individual replacement foot
Ready for custom slicing
macbook_support_DUAL_PETG_TPU_0.08HQ_optimized.3mf
Prepared Bambu Studio project
Separate selectable TPU and PETG processes
Separate TPU and PETG filament profiles
Optimized support settings for each material
0.08 mm High Quality printing
Original model geometry and orientation preserved
The STL contains a single foot.
Duplicate the model in your slicer if you need two, three or all four replacement feet.
FIT
Printer calibration and material properties can affect the fit of the smaller retention post.
Before heat-staking the foot, make sure the post passes through the original mounting opening without requiring excessive force.
If the post is slightly too tight, lightly sand the cylindrical surface and test it again.
Do not force an oversized printed post through the aluminum cover.
If every print is consistently too tight or too loose, check filament flow and dimensional calibration before changing the overall model scale.
3D printing settings
3D PRINTING SETTINGS
The supplied 3MF contains two separate optimized printing processes:
TPU – Recommended
PETG – Tested Alternative
Both use the same high-quality model geometry and orientation, but the support settings are tuned separately for the different materials.
For the easiest setup, use:
macbook_support_DUAL_PETG_TPU_0.08HQ_optimized.3mf
When switching materials, make sure you select both the matching process and matching filament profile.
Do not use the TPU process with the PETG filament profile or vice versa.
TPU – RECOMMENDED MATERIAL
For the finished feet, TPU around 95A Shore hardness is recommended.
The 3MF includes:
MacBook Feet – TPU – 0.08mm HQ Optimized
and a selectable:
Generic TPU
filament profile.
TPU gives the finished foot significantly better grip and a more appropriate rubber-like feel than PETG.
TPU QUALITY SETTINGS
The optimized TPU process keeps the high-quality settings used for the model:
Printer: Bambu Lab A1
Nozzle: 0.4 mm
Layer height: 0.08 mm High Quality
Initial layer height: 0.20 mm
Walls/perimeters: 5
Infill: 25%
Infill pattern: Gyroid
Scale: 100%
Supports: Enabled
The relatively high wall count is intentional because the central retaining post is small and benefits from additional perimeter strength.
TPU SUPPORT SETTINGS
TPU supports tend to bond more strongly and flex rather than snapping away like PLA supports.
The dedicated TPU process therefore uses larger clearances and slower support printing to make removal easier.
Recommended TPU support settings in the supplied project:
Supports: Normal automatic
Top support Z distance: 0.32 mm
Bottom support Z distance: 0.24 mm
Support/object XY distance: 0.50 mm
Support-interface spacing: 0.35 mm
Support base-pattern spacing: 2 mm
Support speed: approximately 35 mm/s
Support-interface speed: approximately 25 mm/s
These larger gaps are intentional.
Reducing them may improve the underside appearance slightly, but TPU supports can become considerably more difficult to remove.
GENERIC TPU FILAMENT PROFILE
The included Generic TPU filament profile uses a conservative TPU starting point suitable for the prepared Bambu Lab A1 project.
Typical saved values include approximately:
Nozzle temperature: 240°C
Textured PEI bed temperature: 45°C
These values are starting points only.
TPU varies considerably between brands and hardnesses, so use the temperature and maximum volumetric flow recommended by your filament manufacturer when necessary.
TPU printing tips
For reliable results:
Dry the TPU before printing
Use a clean filament path
Avoid excessive print speed
Make sure the filament feeds smoothly
Use a properly calibrated flow rate
Keep retractions conservative if stringing becomes excessive
For these feet, 95A TPU is a good starting point because it remains flexible while still being firm enough to support the weight of the laptop.
Very soft TPU may make both printing and heat-staking the small retaining post more difficult.
PETG – TESTED ALTERNATIVE
A separate PETG process is preserved in the same 3MF:
MacBook Feet – PETG – 0.08mm HQ Optimized
This is based on the PETG configuration used to print the original test part.
PETG is not as suitable as TPU for the contact surface of a laptop foot because it is harder and more slippery, but it remains a useful alternative if TPU is unavailable.
PETG advantages include:
Easy dimensional printing
Strong retaining post
Clean heat-staking
Good durability
Easier support removal than TPU
PETG QUALITY SETTINGS
The PETG process retains approximately:
Nozzle: 0.4 mm
Layer height: 0.08 mm
Initial layer height: 0.20 mm
Walls/perimeters: 5
Infill: 25% Gyroid
Scale: 100%
Supports: Enabled
The existing calibrated PETG filament profile is also preserved in the 3MF.
PETG SUPPORT SETTINGS
The PETG process uses its own support clearances rather than the larger TPU values.
Use the supplied PETG process without replacing its support settings with the TPU configuration.
The existing custom support strategy is designed to reduce unnecessary support material while still protecting the underside and central retention geometry.
SUPPORT BLOCKER
The supplied 3MF includes the existing custom support blocker used to prevent unnecessary support generation around areas of the foot that do not need it.
Do not delete the support blocker when using the prepared project.
If you import only the STL and create a completely new project, you will need to reproduce your own support strategy.
MODEL ORIENTATION
Use the orientation supplied in the 3MF.
Do not use automatic orientation unless you intend to completely redesign the support configuration.
The prepared orientation was chosen to maintain:
Circular outer shape
Retention-post accuracy
Good visible-surface quality
Controlled underside supports
Reliable build-plate adhesion
BUILD-PLATE ADHESION
The prepared project uses a brim to stabilize the small part.
Recommended starting point:
Brim type: Outer brim
Brim width: 5 mm
Brim/object gap: 0.10 mm
Remove all brim remnants before installing the foot.
The large circular contact surface needs to sit completely flat against the MacBook's aluminum bottom case.
PRINTING MULTIPLE FEET
The STL contains one replacement foot.
If replacing all four feet, duplicate the model four times in the slicer.
For TPU, leaving some space between the models may help reduce stringing between individual feet.
Printing one test foot first is recommended, particularly when:
Using a different TPU brand
Using a different TPU hardness
Printing on a machine other than the Bambu Lab A1
Installing the feet on an A1286 or A1297 rather than the tested A1278
SUPPORT REMOVAL
Allow the print to cool before removing the supports.
The central cylindrical retention post is the most important feature to protect.
Remove the larger support areas first.
Work gradually toward the central post.
Avoid pulling or twisting the post sideways.
Use tweezers or small needle-nose pliers when necessary.
Remove any support material around the base of the post.
Check that the post remains straight.
TPU supports may stretch instead of snapping away.
Use small scissors, flush cutters or tweezers where necessary rather than aggressively pulling on the support material.
TEST FIT
Before heat-staking:
Remove all supports.
Remove the brim completely.
Check the circular base for leftover material.
Inspect the retaining post.
Insert the post through the bottom-cover mounting hole.
Confirm that the large foot sits flat against the outside surface.
If the post is too tight, lightly sand it.
Do not force it through the aluminum case.
HEAT-STAKING THE RETENTION POST
Always remove the MacBook bottom cover before doing this.
With the foot installed through the cover:
Hold the large foot firmly against the outside surface.
Carefully heat only the very end of the smaller cylindrical post from the inside.
Allow the end to soften.
Gently press and spread the softened material outward.
Create a mushroom-shaped head wider than the original opening.
Stop heating once enough material has spread to retain the foot.
Allow it to cool completely.
Gently check that the foot cannot pull through the opening.
With TPU
TPU remains flexible after cooling, so create a reasonably wide retaining head.
Do not overheat the material.
A small amount of suitable adhesive can optionally be added if more retention is desired.
With PETG
PETG softens and then becomes rigid again as it cools, making it particularly easy to create a firm heat-staked retaining head.
Avoid overheating the post, as excessive heat can shorten or completely melt it.
Once the foot has cooled and is securely retained, reinstall the MacBook bottom cover.