Sony E-mount lens → ZWO ASI camera (M42) — bayonet plate replacement
Description
Sony E-mount lens → ZWO ASI camera (M42) — bayonet plate replacement
Parametric. Adapts to other lens mounts and other cameras by editing two numbers.
Summary
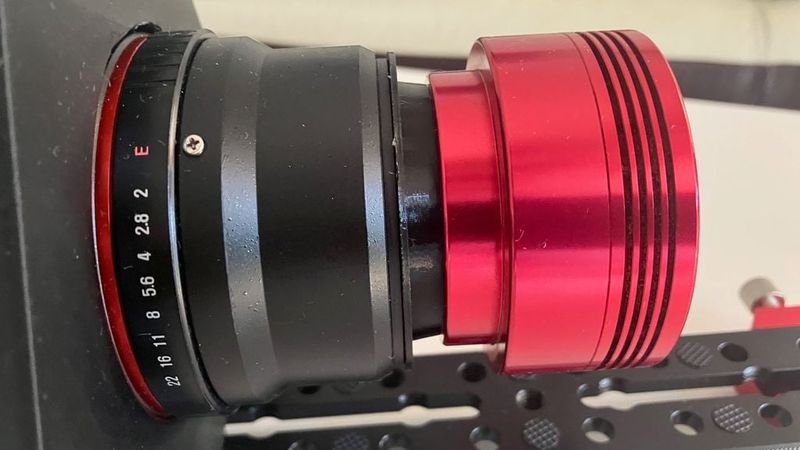
Putting a Sony E-mount lens on a ZWO ASI camera is usually described as impossible, and for a normal adapter it is. Sony E places the sensor 18.00 mm behind the flange face. A ZWO ASI662MC places it 12.5 mm behind the M42 shoulder. That leaves 5.5 mm for the entire adapter — not enough for a bayonet, a locking pin and a spring. ZWO once sold a T2-to-Sony-E adapter and discontinued it; the usual advice on the forums is to give up and buy a Canon EF lens instead.
This design sidesteps the problem by not adapting the bayonet at all. It replaces it.
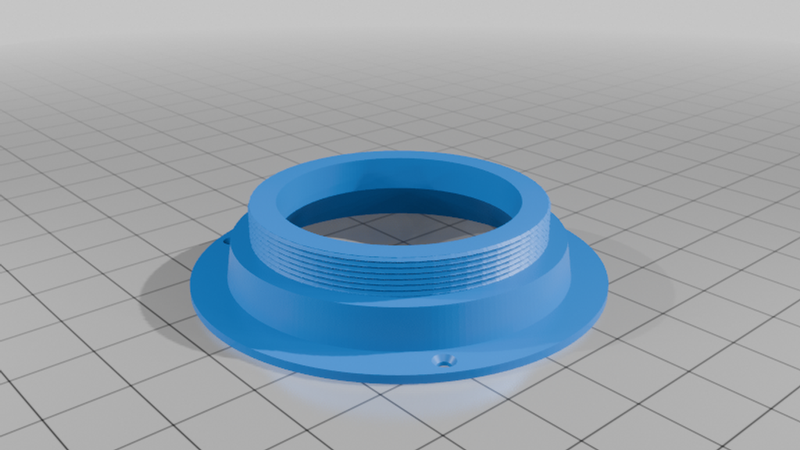
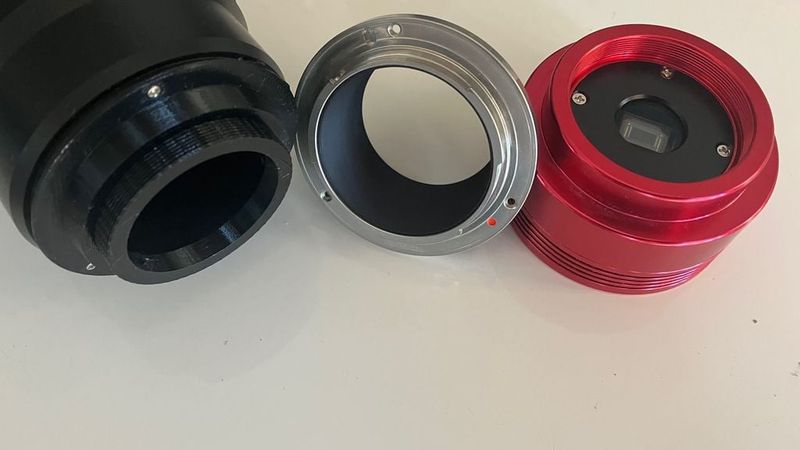
Many E-mount lenses — particularly manual-focus ones like the Samyang/Rokinon primes — don't have their bayonet machined into the barrel. It's a separate plate held on by three small screws. Undo those, lift the plate off, and bolt on a printed plate that ends in an M42×0.75 male thread instead of a bayonet.
Result: a rigid, very short connection with no bayonet in the load path, and the lens's own internal baffling stays exactly where the manufacturer put it.
Modelled here for the Samyang / Rokinon 135 mm f/2 ED UMC (Sony FE) and an ASI662MC, but the OpenSCAD file is parametric and the section below explains how to retarget it.
The one equation
Everything follows from this:
```
STANDOFF = (lens mount flange distance) − (camera back focus)
```
That's how far the M42 shoulder must sit above the plate's flange plane. For Sony E onto an ASI662MC: 18.00 − 12.50 = 5.50 mm.
In the SCAD file:
```
DISC_T = 1.2 // thickness of the original bayonet plate
STANDOFF = 5.5 // the equation above
SHOULDER_Z = DISC_T + STANDOFF
```
Nothing else affects focus. The rest of the file is packaging.
Flange distances
| Mount | Register |
|---|---|
| Sony E | 18.00 mm |
| Micro Four Thirds | 19.25 mm |
| Fujifilm X | 17.70 mm |
| Canon RF / Nikon Z | 20.00 / 16.00 mm |
| Canon EF | 44.00 mm |
| Nikon F | 46.50 mm |
| Pentax K | 45.46 mm |
M42×0.75 (the T-thread) has no inherent register — it's just a thread. Whatever sits behind it defines the geometry, which is why your camera's published back focus is the only reference that matters.
Retargeting the model
Different camera. Change one number. Look up your camera's back focus to the M42 shoulder and recompute `STANDOFF`. Most 62 mm-body ZWO cameras are 12.5 mm, but check — some are 6.5 mm with the front ring removed, and larger-format bodies differ. QHY, Player One and Touptek cameras all publish the same figure.
Different lens mount, same lens family. Change the 18.00 in the equation. A Canon EF version of the same lens would give a 31.5 mm standoff — much easier to print, though at that length you'd want a tube with internal baffles rather than a flat plate.
Different lens. This is the part that needs a caliper. Take the original plate off and measure:
- `DISC_OD` — outer diameter of the plate (58.8 here)
- `DISC_T` — its thickness (1.2 here)
- `SCREW_N`, `SCREW_D`, `SCREW_INSET` — how many screws, what size, how far in from the OD (3 × M1.6 at 2.6 mm here)
- Check the screw holes are actually at 120°. Some mounts clock one hole off-symmetric so the plate only fits one way. Use `SCREW_A0` to rotate the bolt circle if needed.
Then confirm the seating face. The plate must bed flat on the barrel and the printed part must reproduce that same plane. If your lens locates its plate on a spigot or a step rather than a flat face, you'll need to model that feature — and let only one surface control the register. Constraining two faces at once is how you end up 0.5 mm long.
Sanity check before printing: if `STANDOFF` comes out negative or under about 3 mm, the combination isn't buildable and no amount of clever geometry will fix it.
Print settings
- PETG. PLA works but softens around 60 °C, and this part sits behind a lens in a hot car. PETG also holds its register better under sustained screw load.
- 0.12 mm layers. The M42×0.75 thread needs it. Coarser layers give a thread that binds or strips.
- Plate face down, thread pointing up. The seating face is then the first layer, dead flat off the build surface, and the thread slices as clean horizontal circles. No supports anywhere.
- Elephant-foot compensation on. Any bulge at the bottom edge effectively lengthens the part, which is the direction you can't afford.
- 6 perimeters, 40 %+ infill.
Prints in about 20 minutes. Iterating is cheap — take advantage of that.
Post-printing
1. Deburr the bottom edge with a blade and check the plate beds without rocking.
2. Drill the screw holes to size if they came out tight.
3. Blacken the bore. Matte black acrylic, flocking, or a marker in a pinch. PETG is glossy and this is a 12 mm barrel with a fast cone going down it. Keep paint off the seating face and the shoulder — those set your register.
4. Swap the mount indoors. The rear element is exposed during the change. Keep the original plate and screws in a labelled bag; this is fully reversible.
5. Snug, not tight, on M1.6 into a 1.2 mm plastic plate.
Checking focus, and fixing it if it's off
Point at something distant. You want infinity reached with a little travel left on the focus ring — that's the target, not a hard stop.
If infinity is unreachable, the part is too long. Measure how much:
```
δ = f² / (s − f) [mm, f = focal length]
```
where `s` is the farthest distance that still comes to sharp focus at the infinity stop. For a 135 mm lens: sharp at 10 m means you're 1.9 mm long; at 20 m, 0.9 mm; at 50 m, 0.4 mm. Subtract that from `STANDOFF` and reprint.
Bias short, never long. A part that's slightly short costs you close focus you'll never use on a telescope mount. A part that's long costs you infinity, which is the entire point.
Notes and limitations
Aperture. With the electronic mount gone, an AF lens sits stuck wide open with no way to stop down. This is only practical with a manual lens that has a physical aperture ring — which for astro use is what you want anyway.
Sensor size. The bore is 34 mm through the thread. Fine for anything up to roughly APS-C. Full frame needs about 44 mm of clear aperture at 12.5 mm back focus, and M42's minor diameter is 40.9 mm, so full frame simply doesn't fit through a T-thread. That's a limitation of the standard, not of this part — it's why ZWO moved to M48 and M54 for their larger sensors.
Load. Don't hang a heavy lens off this plate. Mount the lens in tube rings on a dovetail and let the camera hang off the back. The printed plate locates the camera; it should never support the lens.
Other Samyang lenses. Several Samyang/Rokinon manual primes appear to share this plate design across the range. I've only verified the 135 mm f/2. If you measure another and the numbers match, please post a Make — it would be useful to know how far this carries.
Safety
Built for solar work. If you're pointing this at the Sun, the filter goes on the front of the lens, in a cell that can't be lifted off by a gust, and it must be proper solar film — Baader AstroSolar or equivalent. A variable ND is not a solar filter at any setting: it's a crossed polariser, near-transparent in the infrared, and gives you no warning before something is damaged.
Files
- `samyang_disc_to_m42_final.scad` — parametric source, edit this
- `.stl` — Samyang 135 mm f/2 FE → ZWO ASI, 12.5 mm back focus
Verified on an ASI662MC: infinity reached with a little slack. Licence: CC BY 4.0 — remix freely, and please post your measurements if you adapt it to another lens.