Glove box enclosure and lid for airplane, boat, car, etc.

Description
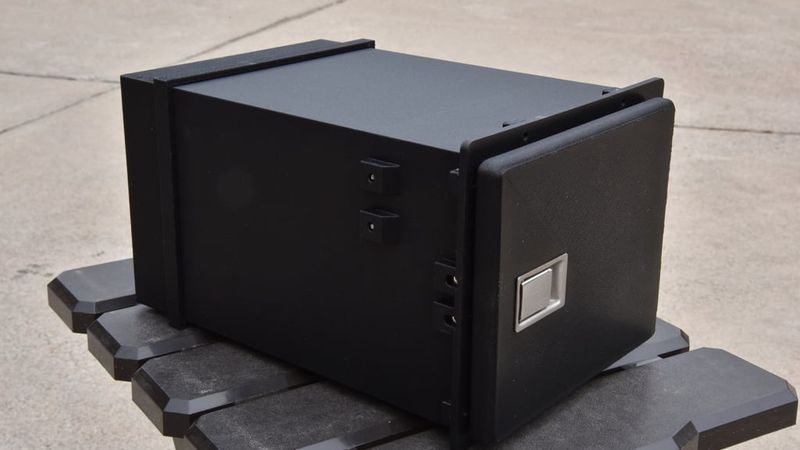
This is a glove box I designed for my airplane. Everything is designed to be printed without supports, however you may have to rotate some of the pieces in the slicer such as the back lid for them to print properly. I do not recommend using normal PLA as it's prone to deform under high summer temps. I'm using Polymaker HT-PLA. Minimum print volume size to print this properly is 156x174x210mm, but I'm including the Fusion files for the basic parts so you can customize everything to your requirements. As designed the enclosure requires a panel opening of 132x160mm. I printed out all the parts using 30% infill which makes the enclosure strong enough to stand on. All of the print files are in STEP format for increased accuracy.
For the basic enclosure all you will need to print is the enclosure, the back lid, latch receiver, and the door. The two different tabs to captivate the nuts are optional, but will make installation easier as they keep the nuts from falling out once they are glued in place. There are 8 of each for a full set.
A drill guide is included for drilling holes in the panel to accept the enclosure. The holes in the print file are for reference so you'll need to drill them out for whatever transfer punch you are using.
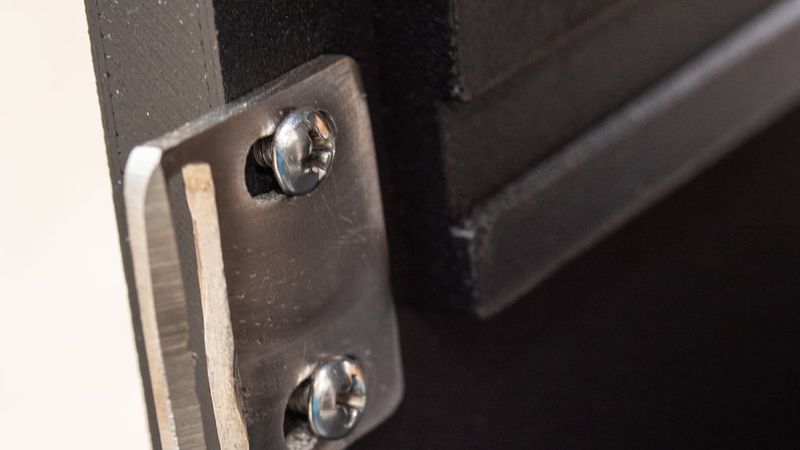
Most of the hardware takes 6-32 screws of various lengths both pan head and countersunk flat head. All of the nuts used are 6-32 square. Both the 4" hinge and paddle latch are available on Amazon, but you will need to either 3d print the latch receiver from the included file or do as I did and cut one manually out of stainless bar stock. You will have to make small adjustments to the receiver back and forth and side to side adjustments on the paddle latch to make everything close and latch correctly. Adjusted properly the latch will close with minimal effort and hold securely). The 3d printed latch receiver works as is, but I had to grind a 45 degree bevel on the stainless latch at the point in which it engages the paddle latch catch mechanism. If you are really good at printing advanced materials, you could certainly print this in more resilient material for longevity. The paddle latch catch mechanism is plastic, so the reality is even the latch receiver printed out of normal material should last a long time. There are 16 square nuts used. For each of them there are two different types of small tabs to be printed and CA glued to the enclosure to captivate the nuts. Use care when gluing the 4 vertical tabs as the nuts are designed to move back and forth for adjustment, so you don't want any glue to come in contact with the nuts. The back lid is designed to be CA glued to the enclosure, but reference holes are provided in case you want to drill and tap screws for extra insurance. I recommend using M2x8 screws for this. The door requires threads for the 6-32 hinge screws. I just tapped these with a 6-32 bottom tap for 6-32x1/4" screws. If you want to use threaded inserts you'll need to drill out the holes larger to accept them.
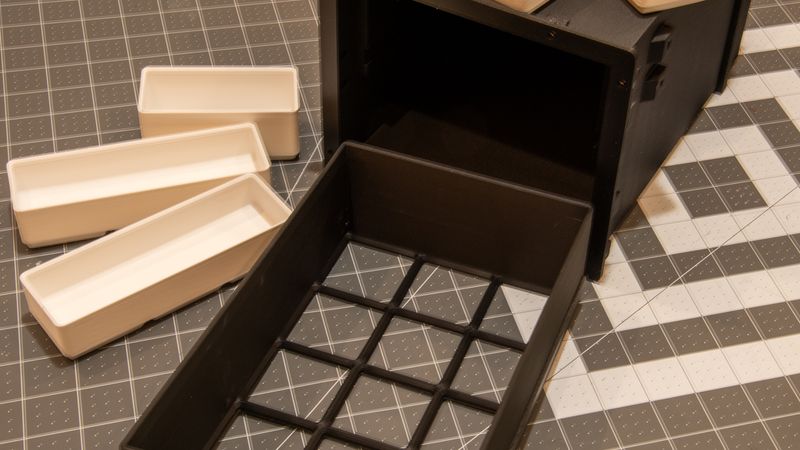
There is an option to add a drawer which accepts Gridfinity bins. If you design your own bins using the Fusion Gridfinity Generator plugin, you will need to change the base width unit and base length unit size to 45.8mm. A basic set of bins are included in the files, but the Fusion plugin is very handy if you want to modify the size of the bins to fit your own needs. The drawer has two long slides which must be CA glued to the drawer. The drawer slides which attach to the enclosure are different with the thicker one needing to screw into the hinge side of the enclosure. I used a small amount of wax to allow the drawer to slide smoothly on the slides.
Minimum parts to make a functional unit:
Glove Box Enclosure
Glove Box Enclosure Back Lid
Door v4
Latch Receiver
Not required, but recommended:
Glue On Front Nut Captive (8 ea)
Glue on Top Nut Captive (8 ea)
Optional parts in the quantities I am using:
Glove Box Drawer(1 ea)
Glove Box Enclosure Left Side Bracket(1ea) (Names are backwards depending on orientation, thicker one goes on hinge side)
Glove Box Enclosure Right Side Bracket(1ea)
Glove Box Drawer Gridfinity Drawer Slide(2ea)
First level bins:
Glove Box Drawer 2x2(1ea)
Glove Box Drawer Bin 2x3(1ea)
Glove Box Drawer 1x4(1ea)
Glove Box Drawer 1x1 battery holder(0 or 1ea) (holds 4 AA batteries)
Glove Box Drawer 1x1 (0, 1 or 2ea) (if you don't want the battery holder print 1 or 2 of these instead)
Second level stacked bins:
Glove Box Drawer 1x3(2ea)
Glove Box Drawer 1x2(1 or 2ea) (these are taller and should go in the back)
Required parts and specialty tools:
Aramox Stainless Steel Flush Mount Paddle Lock Handle
https://www.amazon.com/dp/B0DQWTBMLX
Stainless Steel Heavy Duty Piano 4 inch
https://www.amazon.com/dp/B0FX27TPBL
6-32 Stainless Steel Plain Finish Square Nut
https://www.amazon.com/dp/B07F3X5C4C
6-32 UNC Stainless Steel Phillips Flat Head Machine Screws Nuts Assortment Kit
https://www.amazon.com/dp/B07GTZN4GJ
6-32x1/2" Phillips Pan Head Machine Screws (2each)
https://www.amazon.com/Yinpecly-Phillips-Machine-Assortment-Stainless/dp/B0FJF2PJHH
6-32 Bottom Hand Tap
https://www.amazon.com/dp/B007W51AFU
Starrett T-Handle Tap Wrench 93-A (Recommended, but much cheaper options available)
https://www.amazon.com/dp/B0006J4DNK
Optional parts and tools:
Starrett Automatic Center Punch 18AA (Recommended, but much cheaper options available)
https://www.amazon.com/dp/B0006J4Q5U
M2X0.4 Thread Tap
https://www.amazon.com/dp/B0GHRZ6GMX
M2 x 8mm Thread Pitch 0.4 mm Stainless Steel 304 Hex Socket Head Cap Screws
https://www.amazon.com/dp/B094NVN97P
Polymaker HT-PLA-GF Filament 1.75mm Black, High Temp PLA for 3D Printing, Heat Resistant to 150°C (This is the filament I am using)
https://www.amazon.com/dp/B0DZNBYW5F
304 Stainless Steel Flat Bar, 1/8" Thickness 1 3/16" Width (This is for the latch receiver if you want to manually cut one using the 3d print as a template)