advancedSingle Board Computers (SBCs)15-Feb-2020
Volume Control on Raspberry Pi with IR Remote Control

Anton Shagaev
Tashkent, UZ
2 days
--
6
Friends, after installing Alexa on my Raspberry Pi 3b (hereinafter RPi), the idea arose to control the volume, since I often ask Alexa to play music. I don't have a good microphone yet, and Alexa simply doesn't hear my command to stop when the music is loud. But even if there were a microphone, it wouldn't solve the problem of decreasing and increasing the volume, as AlexaPi does not support such functionality. Also, when someone calls me on the phone, I can't turn down the volume and have to physically disconnect power to the RPi. This instruction is suitable for all those who would like to control the volume on RPi or execute any other terminal command using an IR remote. At home, I had 3 unnecessary IR remotes lying idle, and I decided to use the smallest one for the RPi. I performed this setup on the Raspbian Buster Lite system, kernel version 4.19. So, let's get started.
What you'll need
Materials
- 1 pc
- 3 pcs
- Solder1 pc
- Heat shrink tubing1 pc
Tools
- Soldering iron1 pc
- Soldering hot air gun1 pc
Steps
1
Connect the IR receiver to the GPIO interface on the RPi
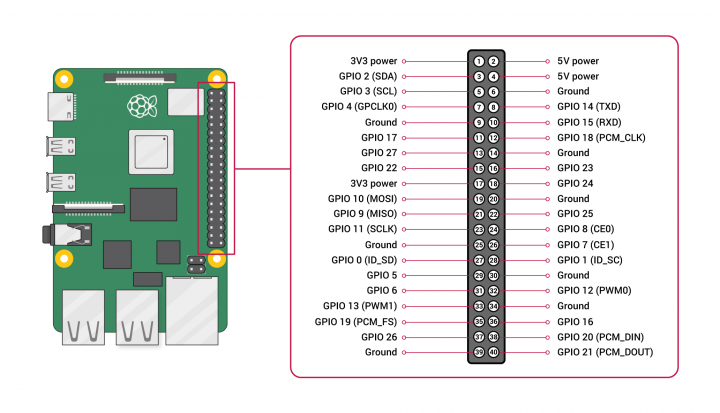
General purpose input/output diagram on RPi
![[object Object]](https://tinkster.dev/api/images/file/IRDA-720x451.png)
[object Object]
First, let's set up our IR receiver without mounting it into the RPi case. This IR receiver supports a voltage from 2.5 to 5.5 volts, so it can be powered from a 3.3V or 5V connector. You can use female-to-female jumper wires, but the IR receiver's pins will not fit snugly inside these connectors, so I decided to use male-to-female wires and solder the male ends to the IR receiver's pins for a reliable connection. It's also important to know your remote's frequency before buying an IR receiver, but it's usually 36 or 38kHz. Honestly, I didn't know my IR remote's frequency and bought a second IR receiver at 36kHz just in case, but in the end, it wasn't needed.
Power off the RPi. Next, connect pin #1 on the IR receiver to Ground on the RPi (physical pin #9). Connect pin #2 on the receiver to 3V3 (physical pin #1), and connect pin #3 to GPIO 17 (physical pin #11).
Then, apply power, boot the system, and log into the RPi via SSH from another machine.
tinkster@almalinux:~#
1ssh [email protected] #Local IP address of RPi
2
Installing LIRC and reading infrared remote control button codes

Installing LIRC and reading infrared remote control button codes
LIRC is an open-source software package that allows receiving and transmitting infrared signals using Linux.
Update packages:
tinkster@almalinux:~#
1sudo apt-get update
Install LIRC:
tinkster@almalinux:~#
1sudo apt-get install lirc
Most likely the installation will result in an error - Failed to start Flexible IR remote input/output application support (Failed to start Flexible IR Remote I/O application support), because some LIRC configuration files have a .dist suffix added and it needs to be removed by moving the files with a new name:
tinkster@almalinux:~#
1sudo mv /etc/lirc/lirc_options.conf.dist /etc/lirc/lirc_options.conf2sudo mv /etc/lirc/lircd.conf.dist /etc/lirc/lircd.conf
Install LIRC again:
tinkster@almalinux:~#
1sudo apt-get install lirc
Next, edit the file lirc_options.conf:
tinkster@almalinux:~#
1sudo nano /etc/lirc/lirc_options.conf
Change the values driver и device to the following:
tinkster@almalinux:~#
1driver = default2device = /dev/lirc0
Open the file config.txt in the boot folder:
tinkster@almalinux:~#
1sudo nano /boot/config.txt
Under the line
tinkster@almalinux:~#
1# Uncomment this to enable infrared communication.
add the following values:
tinkster@almalinux:~#
1dtoverlay=gpio-ir,gpio_pin=17
Next, stop LIRC, start it again and check that there are no errors:
tinkster@almalinux:~#
1sudo systemctl stop lircd2sudo systemctl start lircd3sudo systemctl status lircd
Reboot the system:
tinkster@almalinux:~#
1sudo reboot
After the system reboots, we need to test the IR remote.
Stop LIRC:
tinkster@almalinux:~#
1sudo systemctl stop lircd
and enter the following command:
tinkster@almalinux:~#
1sudo mode2 -d /dev/lirc0
Point our IR remote at the IR receiver and press any buttons on the remote. You should see something similar:
tinkster@almalinux:~#
1Using driver default on device /dev/lirc02Trying device: /dev/lirc03Using device: /dev/lirc04Running as regular user pi5space 61691356space 18535947pulse 90208space 44809pulse 59010space 53811pulse 56812space 53913pulse 59814space 53215pulse 59416space 53817pulse 56818space 56519.....
If you observe a similar picture, it means the system sees your remote.
Exit this mode by pressing CTRL+Z.
All your IR remote configuration files with the extension .conf should be placed in the folder /etc/lirc/lircd.conf.d/. This folder already contains the file devinput.lircd.conf, but in this setup we won't need it and we will hide it from LIRC by simply moving it with a new extension:
tinkster@almalinux:~#
1sudo mv /etc/lirc/lircd.conf.d/devinput.lircd.conf /etc/lirc/lircd.conf.d/devinput.lircd.conf.copy
Next, we need to read the key codes of our IR remote. In this setup, I used 4 buttons: VOL+, VOL-, a green button for turning sound on/off, and a red button for rebooting the RPi.
Read the codes using the program irrecord. I'll say right away, the program is very buggy and I had to find out the codes for my buttons in two stages.
Go to the home folder:
tinkster@almalinux:~#
1cd ~
Enter the following command and press Enter
tinkster@almalinux:~#
1sudo irrecord -d /dev/lirc0 -H default -f
When the program outputs:
tinkster@almalinux:~#
1Press RETURN to continue
Press again Enter.
Next, after
tinkster@almalinux:~#
1Enter name of remote (only ascii, no spaces)
enter the remote name. In my case alexapi, you will have your own name. Press Enter.
Then the program will output the following message:
tinkster@almalinux:~#
1Now start pressing buttons on your remote control.23It is very important that you press many different buttons randomly4and hold them down for approximately one second. Each button should5generate at least one dot but never more than ten dots of output.6Don't stop pressing buttons until two lines of dots (2x80) have7been generated.89Press RETURN now to start recording.
After pressing Enter you need to press keys on the remote in any order until at least one dot appears in the terminal. I pressed each key until 2 dots appeared.
Next, the program will output the message:
tinkster@almalinux:~#
1Please enter the name for the next button (press <ENTER> to finish recording)
You need to enter the registered button names. In my case, these were the names KEY_VOLUMEUP, KEY_VOLUMEDOWN, KEY_MUTE и KEY_POWER.
If you want to know all registered button names in irrecord, then before the button recording procedure, you can enter the command and find out all the names:
tinkster@almalinux:~#
1irrecord --list-namespace
After entering the button name, press Enter the program will ask you to press the corresponding button on the remote:
tinkster@almalinux:~#
1Now hold down button "KEY_VOLUMEUP".
Next, the program will ask you to enter the next button name:
tinkster@almalinux:~#
1Please enter the name for the next button (press <ENTER> to finish recording)
If you have already entered all buttons, simply press Enter
The program will save the data to a file and say:
tinkster@almalinux:~#
1Successfully written config file alexapi.lircd.conf
Open this file:
tinkster@almalinux:~#
1nano alexapi.lircd.conf
and see its structure
tinkster@almalinux:~#
1begin remote2name alexapi3flags RAW_CODES|CONST_LENGTH4eps 305aeps 1006gap 1080347begin raw_codes8name KEY_VOLUMEUP99018 4467 595 537 621 51110575 531 597 536 623 51311573 530 597 535 624 50812567 1675 623 1620 596 167213572 1670 621 1622 600 166814577 1665 622 1620 594 53815622 1620 593 1675 572 167016617 1625 600 532 627 50517570 536 602 1666 568 53818604 527 621 511 572 53319596 1673 571 1671 626 16162059721name KEY_VOLUMEDOWN22.....23name KEY_MUTE24.....25name KEY_POWER26.....27end raw_codes28end remote
In this case, we captured button codes in "raw" form. They can be left as is, but I preferred to convert them to 32-bit values. It wasn't possible to make them 32-bit immediately because irrecord works very incorrectly on Raspbian Buster Lite, and after numerous attempts, configuration files with empty button code values were constantly created - 0x0. That's why I "grabbed" button codes in two stages, as this scheme eventually worked.
Close the file and enter the command:
tinkster@almalinux:~#
1sudo irrecord -d /dev/lirc0 -H default -a alexapi.lircd.conf
In the terminal, you should see the new file structure:
tinkster@almalinux:~#
1begin remote2name alexapi3bits 324flags SPACE_ENC|CONST_LENGTH5eps 306aeps 1007header 9018 44678one 598 16519zero 598 52610ptrail 59711gap 10803412toggle_bit_mask 0x013frequency 3800014begin codes15KEY_VOLUMEUP 0xXXXXXXXX16KEY_VOLUMEDOWN 0xXXXXXXXX17KEY_MUTE 0xXXXXXXXX18KEY_POWER 0xXXXXXXXX19end codes20end remote
Copy the new content from the terminal and open the filealexapi.lircd.conf:
tinkster@almalinux:~#
1nano alexapi.lircd.conf
Delete all lines from the file - CTRL+K and insert the new data.
Save the file and move it to the folder /etc/lirc/lircd.conf.d/:
tinkster@almalinux:~#
1sudo mv alexapi.lircd.conf /etc/lirc/lircd.conf.d/ alexapi.lircd.conf
Starting LIRC:
tinkster@almalinux:~#
1sudo systemctl start lircd
and testing our buttons by entering the command:
tinkster@almalinux:~#
1irw
Now try pressing the volume up button and you should see something like:
tinkster@almalinux:~#
10000000000ff7887 00 KEY_VOLUMEUP alexapi
Do the same for all buttons from which you "grabbed" the codes.
If you see output values after pressing buttons on the IR remote, this means that the codes of the pressed buttons are correctly received by the IR receiver and recognized by LIRC.
3
Assigning commands to IR remote buttons
Next we need to create two bash files, the first will be responsible for increasing the volume, and the other for decreasing.
Go to /usr/bin/
tinkster@almalinux:~#
1cd /usr/bin
Create the volup file:
tinkster@almalinux:~#
1sudo nano volup
And insert the following into it:
tinkster@almalinux:~#
1#!/bin/bash2sudo amixer set PCM -- $[$(amixer get PCM|grep -o [0-9]*%|sed 's/%//')+5]%
In this case, the volume will increase by 5% with each press of the corresponding button. You can set your own values in percent.
Save the file and make it executable:
tinkster@almalinux:~#
1sudo chmod +x volup
Next, create the voldown file:
tinkster@almalinux:~#
1sudo nano voldown
and insert the following into it:
tinkster@almalinux:~#
1#!/bin/bash2sudo amixer set PCM -- $[$(amixer get PCM|grep -o [0-9]*%|sed 's/%//')-5]%
Make it executable:
tinkster@almalinux:~#
1sudo chmod +x voldown
Next, rename the file /etc/lirc/irexec.lircrc.dist to /etc/lirc/irexec.lircrc by simple moving:
tinkster@almalinux:~#
1sudo mv /etc/lirc/irexec.lircrc.dist /etc/lirc/irexec.lircrc
Open the file irexec.lircrc:
tinkster@almalinux:~#
1sudo nano /etc/lirc/irexec.lircrc
Erase all lines, CTRL+K and insert the following into it:
tinkster@almalinux:~#
1begin2prog = irexec3remote = alexapi4button = KEY_POWER5config = sudo shutdown -r now6end78begin9prog = irexec10remote = alexapi11button = KEY_VOLUMEUP12config = sudo volup13end1415begin16prog = irexec17remote = alexapi18button = KEY_VOLUMEDOWN19config = sudo voldown20end2122begin23prog = irexec24remote = alexapi25button = KEY_MUTE26config = sudo amixer set PCM toggle27end
Save the file and then run the command:
tinkster@almalinux:~#
1/usr/bin/irexec /etc/lirc/irexec.lircrc
Try pressing the red POWER button on the IR remote, the system should reboot. This means everything is working and after the system reboots, you need to make irexec a system process so that it starts automatically when the system starts:
tinkster@almalinux:~#
1sudo systemctl enable irexec
Reboot the system again and your IR remote will be ready to use. Similarly, you can program any buttons on the remote from which you 'grabbed' the codes and assign them terminal commands in the file irexec.lircrc
4
Installing the IR receiver in the RPi case
Installing the IR receiver in the RPi case
Installing the IR receiver in the RPi case
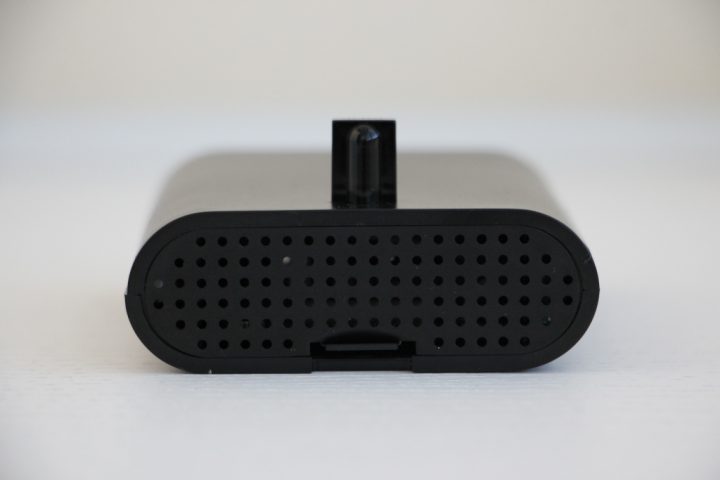
In this case, it is the choice of each individual user where they want to install their IR receiver, but I mounted it on the top cover of the RPi case.
You will need to desolder the wires from the IR receiver contacts, then mark three holes according to the contact arrangement and drill them with a 1mm drill bit. The IR port can be glued to the case with glue ABRO Epoxy Steel Its setting time is 10 minutes. I also glued the contacts on the reverse side for a more secure bond with the case. Next, cut pieces of heat shrink tubing, put them on the wires, solder them to the terminals of the IR receiver according to the diagram, place the heat shrink tubing over the soldering points, and shrink them with a soldering heat gun.
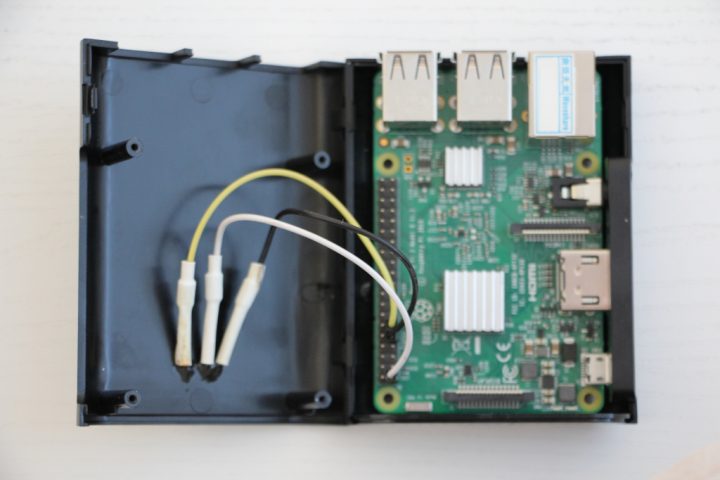
Next, assemble the RPi case, install it in the desired location, and apply power.
Now you can control the sound from your RPi remotely!
I hope you liked this instruction and can apply this knowledge in your own RPi projects.
Discussion (0)
No comments yet. Be the first!
Maker
Anton Shagaev
Tashkent, UZ
Anton is the Founding Engineer at Tinkster. He translates industrial reliability into software architecture, ensuring the platform's core is built to last. Anton studied oil and gas engineering in the United States and also holds two honors degrees from Tomsk Polytechnic University.

AI Project Assistant
Tinkster Neural Core
Hi! I am the AI assistant for this project. Ask me any questions about the assembly, code, or components.