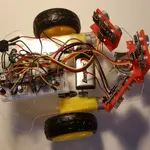
You can find the sketch that controls the robot arm in the github repository under DynamixShield/sketches/RobotArm. I will briefly explain the main parts of the sketch.
1. First, you must include the DynamixSerial class. This class is what you will use to communicate with the Dynamixel servos.
#include
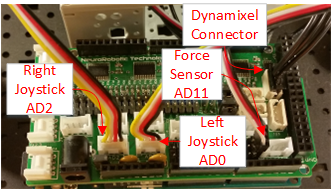
2. Next we have some variables to assign the pins for the joystick and pressure sensors, and to keep track of the servo movements.
#define SERVO_COUNT 5
#define AXIS_COUNT 4
// These constants won't change. They're used to give names
// to the pins used:
const int x1Pin = A0;
const int y1Pin = A1;
const int x2Pin = A2;
const int y2Pin = A3;
const int pressurePin = A11;
//Index of the AxisPos array that controls gripper open/close
const int gripperCloseIdx = 1;
const int gripperOpenIdx = 3;
const int gripperIdx = 4;
int servoPos[SERVO_COUNT];
int servoDir[SERVO_COUNT];
int servoAdd[SERVO_COUNT];
int axisID[AXIS_COUNT];
int axisPos[AXIS_COUNT];
int gripPressure = 0;
3. Then we declare the DynamixelSerial class. This class assumes that it is using Serial1 for communications to the Dynamixel servos. However, if you pass in a hardware serial port here you can override it. This is so the software can be used on custom projects that do not use the DynamixShield.
DynamixelSerial Dynamixel;
4. The next most important part is the setup. We startup our debug serial connection and then begin the DynamixelSerial class. It defaults to a 1 Mbaud communications rate and the pin that it uses to control the half-duplex of the Dynamixel protocol is set based on the board you are using. So on a Due it is pin 22, but on the zero it is pin 2. However, you also have the option of specifying these parameters in the call to the begin method to override what is used for custom projects.
#ifdef ENABLE_DEBUG
Serial.begin(57600);
while(!Serial);
Serial.println("Starting setup");
#endif
Dynamixel.begin (); // or Dynamixel.begin (1000000, 22);
5. Setup then has some code to reset all the servos to their default position to get it ready for movement. It also resets all the variables to their default state.
6. The main processing loop is pretty simple. It just calls processJoysticks() and then delays for 20 milliseconds.
void loop () {
processJoysticks();
delay (20);
}
7. The process joystick method has a loop that goes through each joystick axis and reads the analog value from the joystick.
void processJoysticks() {
String servoPosReport = "", servoAddReport = "", axisReport = "";
// read the analog in value:
for(int i=0; i
axisPos[i] = analogRead(axisID[i]);
8. It then scales the value from the joystick that is between 255 and 755 into a value between -5 and 5. If the value is greater than 1020 then it means we are pressing down on the joystick to close the gripper jaws, so we will let the process gripper method deal with that.
//If it is greater than 1020 then the button is being pressed.
if(axisPos[i] < 1020) {
servoAdd[i] = map(axisPos[i], 255, 755, -5, 5);
}
else {
servoAdd[i] = 0;
}
9. Then we add the movement value to the servos position.
if( (servoPos[i] + servoAdd[i]) >= 0 && (servoPos[i] + servoAdd[i] < 1024)) {
servoPos[i] += (servoDir[i] * servoAdd[i]);
}
10. Then if we had movement on this axis we set the new position of the servo.
if(servoAdd[i] != 0) {
Dynamixel.moveSpeed (i+1, servoPos[i], 150); delay(10);
}
11. Finally, it calls processGripper. That methods starts out by reading the analog signal for the pressure sensor.
void processGripper(String &servoPosReport, String &servoAddReport) {
gripPressure = analogRead(pressurePin);
12. Pushing down on the right joystick closes the girpper, while pushing down on the left joystick opens it. The method checks this by seeing if the axis position of the close or open gripper position is equal to 1023. This is the value read from the joystick when you are pressing down on it. If it is down then we set the servo add to be plus or minus 10. Otherwise, it adds zero.
if(axisPos[gripperCloseIdx] == 1023) {
if(gripPressure < 850) {
servoAdd[gripperIdx] = -10;
}
}
else if(axisPos[gripperOpenIdx] == 1023) {
servoAdd[gripperIdx] = 10;
}
else {
servoAdd[gripperIdx] = 0;
}
13. Then we set the servo position as long as it remains within 0 and 512. The gripper cannot move more than this.
if( (servoPos[gripperIdx] + servoAdd[gripperIdx]) >= 0
&& (servoPos[gripperIdx] + servoAdd[gripperIdx] <= 512)) {
servoPos[gripperIdx] += (servoDir[gripperIdx] * servoAdd[gripperIdx]);
}
14. Finally, if we added to the position then we need to set the new servo position of the gripper.
if(servoAdd[gripperIdx] != 0) {
Dynamixel.moveSpeed (gripperIdx+1, servoPos[gripperIdx], 150);
}
And that is it. There are some other things in the sketch I did not discuss here, but that is mainly for debugging purposes. You can turn on the debugging by uncommenting the //#define ENABLE_DEBUG 1 line at the top. This will print out what is happening as you run the sketch. Use the Arduino IDE to program you the sketch into your microcontroller and then lets run our new robot arm!