advanced3D Printing (FDM)7-Feb-2020
3D printing of the tank lid for the Philips FC7020 Steam Plus 2-in-1 steam cleaner

Anton Shagaev
Tashkent, UZ
2 days
--
5
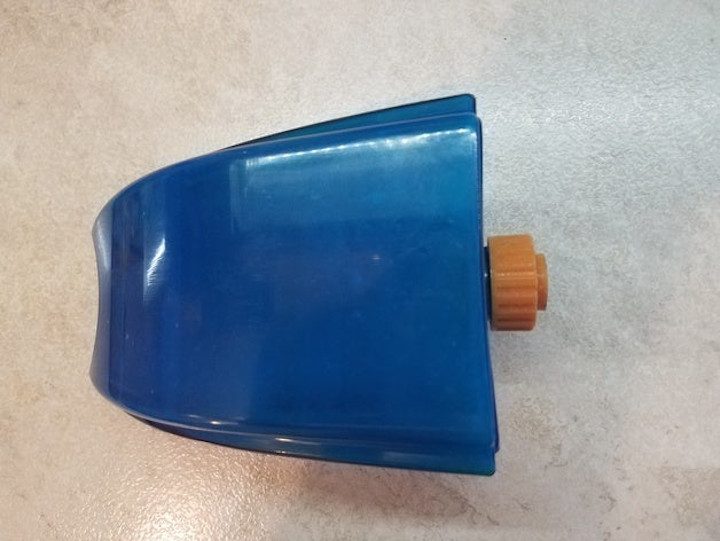
Friends, several years ago my spouse and I purchased a good steam cleaner from Philips, model FC7020 Steam Plus 2-in-1, which can very thoroughly clean a ceramic tile floor. This steam cleaner has a removable blue water tank. It screws on with a special cap. Not long ago this cap cracked and it became impossible to screw it onto the tank. First I tried to glue it with Poxipol glue, but in the end that didn't help, the cap cracked again after several unscrewings and screwings. Then I tried to find something similar on the Internet, but that also didn't succeed, so I decided to take precise measurements of what remained of the cap and design it myself in AutoCAD and print it on a 3D printer.
Steps
1
Printing the tank lid

3D printing of the tank lid for the Philips FC7020 Steam Plus 2-in-1 steam cleaner
3D printing of the tank lid for the Philips FC7020 Steam Plus 2-in-1 steam cleaner
Type of finished product
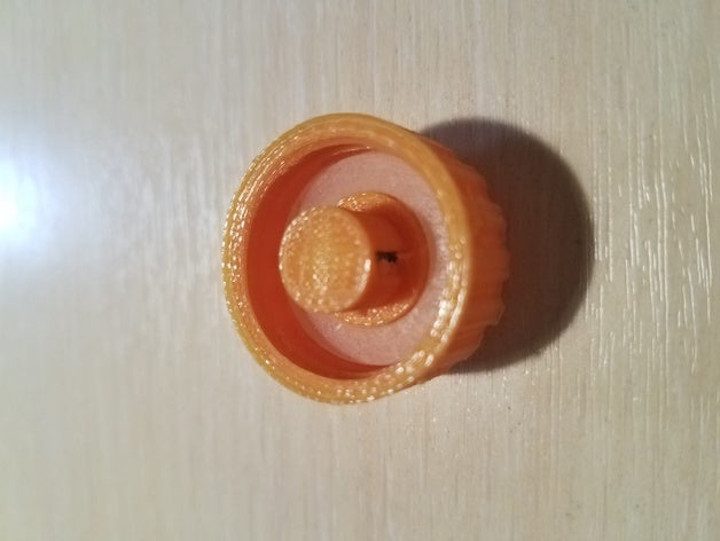
If you have the same problem, you need to do the following. First of all, this cap has a check valve, so you need to carefully gut the old cap and pull out all its internals, which include a spring with a small white ball and a silicone gasket. Also make sure you remove the large silicone gasket from the back side of the cap (the one that provides the seal between the cap and the water tank itself).
I recommend printing the cap using SLS (Selective Laser Sintering) technology for the best results. I used FDM printing, as there are no SLS machines in our city, but if the cap breaks next time, I will order SLS printing online. A cap created using FDM printing will be functional, but the appearance and strength won't be as good as an SLS product.
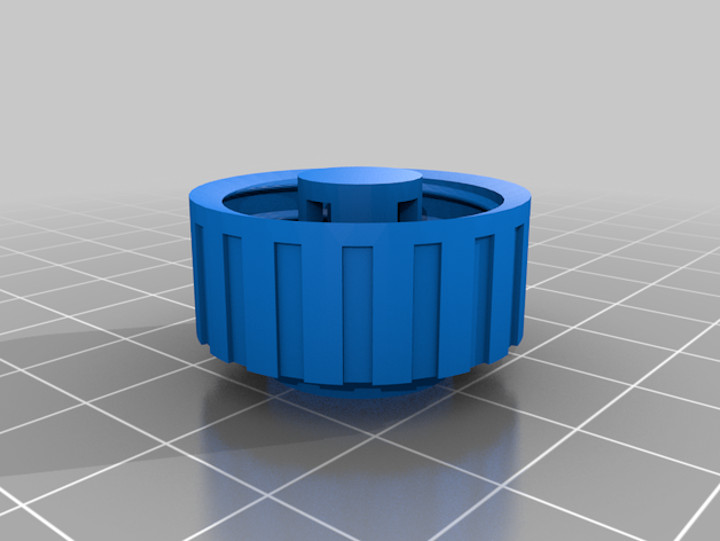
This part consists of 2 parts:
Body – 1pc.
Body insert – 1pc.
First, print the parts. Then install the spring with the white ball and the silicone gasket. Now you need to glue the bushing into the top part of the cap body. The bushing has a very tight fit, so use a needle file to adjust the diameter. As for glue, I would recommend usingAbro Epoxy Steel glue. It has a very fast setting time and is very strong!
When the glue dries, all you will need to do is install the large silicone gasket back in place and screw the cap onto the tank!
Profit!
Discussion (0)
No comments yet. Be the first!
Maker
Anton Shagaev
Tashkent, UZ
Anton is the Founding Engineer at Tinkster. He translates industrial reliability into software architecture, ensuring the platform's core is built to last. Anton studied oil and gas engineering in the United States and also holds two honors degrees from Tomsk Polytechnic University.
Related Projects


AI Project Assistant
Tinkster Neural Core
Hi! I am the AI assistant for this project. Ask me any questions about the assembly, code, or components.